понедельник, 30 апреля 2012 г.

How to Add the Run command Button to the Windows 7 Start Menu

METHOD ONE

Through the Start Menu
1. Open the Start Menu.

2. Right Click on a empty space on the Start Menu and select Properties.

3. Click on the Start Menu Tab and click on Customize.

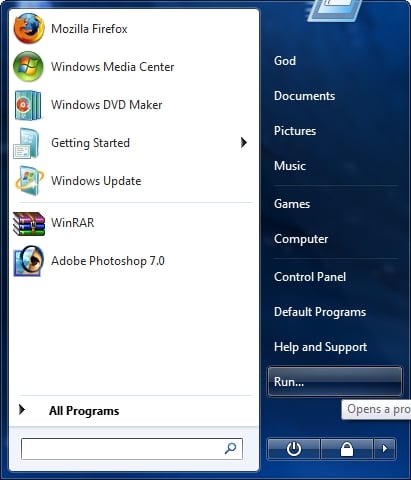
4. Tick the Run Command and OK.


METHOD TWO

Through the Local Group Policy Editor
1. Open the all usersspecific users or groups, or all users except administrators Local Group Policy Editor for how you want this policy applied.

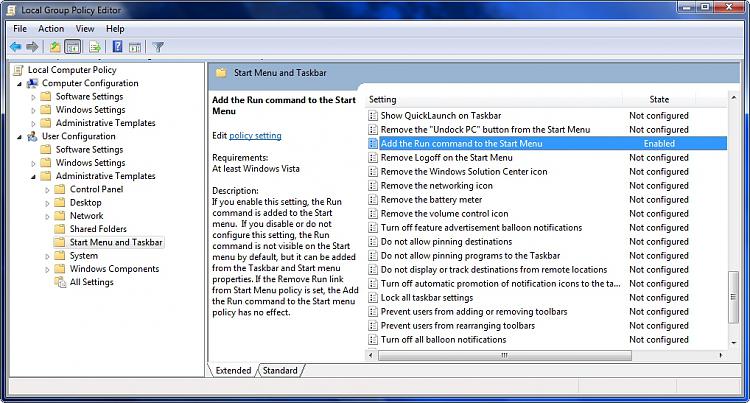
2. In the left pane, click on User ConfigurationAdministrative Templates and Start Menu and Taskbar. (See screenshot below)


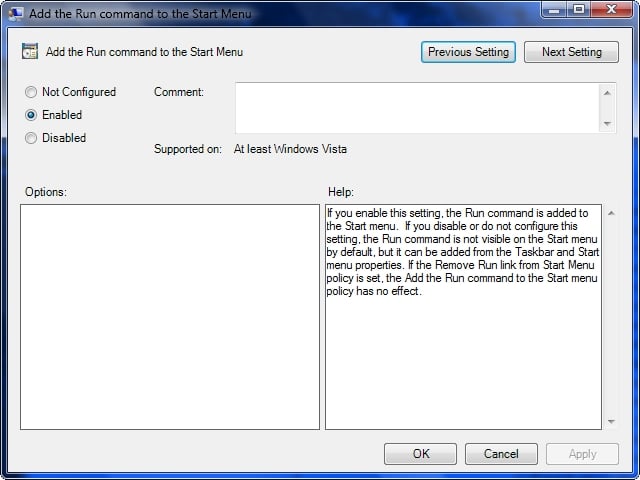
3. In the right pane, right click on Add the Run command to the Start Menu and click on Edit.

Start Menu - Add Run Button-2008-11-18_003759.jpg
4. To Add Search Internet Link to Start Menu
A) Dot Enabled and click on OK.

B) Go to step 6.
5. To Disable Add Search Internet Link to Start Menu
A) Dot Disabled or Not Configured and click on OK. (See screenshot below)

B) Go to step 6.
Start Menu - Add Run Button-2008-11-18_003818.jpg
6. Close the Local Group Policy Editor window.

Start Menu - Add Run Button-2008-11-18_003738.jpg

среда, 18 апреля 2012 г.

Настройка Windows 7 для доступа к общим папкам компьютера с медиаплеера

Настройка Windows 7 для доступа к общим папкам компьютера с медиаплеера

1. Зайдите в Панель управления -> Центр управления сетями и общим доступом -> Изменить дополнительные параметры общего доступа
2. Выберите настройку текущего профиля, нажав значок направленной вниз стрелочки и установите параметры:

Сетевое обнаружение - включить
Общий доступ к файлам и принтерам - включить
Доступ к общим папкам - отключить
Общий доступ с парольной защитой - отключить

Далее запускаем редактор реестра. Нажимаем кнопку Пуск и в строке поиска вводим: regedit и нажимаем Enter

1. Находим ветку HKEY_LOCAL_MACHINE\System\CurrentControlSet\Control\Lsa\
2. Ставим 1 в значение параметра everyoneincludesanonymous
3. Ставим 0 в значение параметра NoLmHash
4. Переходим на ветку MACHINE\System\CurrentControlSet\Services\LanManServer\Parameters
5. Ставим 0 в значение параметра restrictnullsessaccess

Закрываем редактор реестра и перезагружаем компьютер

Теперь сконфигурируйте папку, которую Вы хотите сделать общей:

1. Выберите папку
2. Нажмите правой кнопкой мыши на папку и выберите: Общий доступ -> Конкретные пользователи
3. Из выпадающего списка пользователей для доступа к этой папки выберите: Все
4. Нажмите кнопку Добавить, установите права для всех пользователей этой папки (чтение или чтение и запись), затем нажмите кнопку Общий доступ

На этом настройка закончена. Теперь можно заходить в общие папки компьютера с медиаплеера. Имя и пароль для доступа вводить не нужно.

source

среда, 29 февраля 2012 г.

To set the default to UTF-8, you want to add the following to my.cnf

My Config Add to the end if my.cnf

[mysqld]
init_connect='SET collation_connection = utf8_general_ci'
init_connect='SET NAMES utf8'
character-set-server=utf8
collation-server=utf8_general_ci
skip-character-set-client-handshake
default-storage-engine = MyISAM


[myisamchk]
key_buffer = 384M
sort_buffer = 64M
read_buffer = 16M
write_buffer = 16M


To set the default to UTF-8, you want to add the following to my.cnf

[client]
default-character-set=utf8

[mysql]
default-character-set=utf8


[mysqld]
default-character-set = utf8
collation-server = utf8_general_ci
init-connect='SET NAMES utf8'
character-set-server = utf8


On MySQL 5.5 I have in my.cnf

[mysqld]
init_connect='SET collation_connection = utf8_general_ci'
init_connect='SET NAMES utf8'
character-set-server=utf8
collation-server=utf8_general_ci
skip-character-set-client-handshake
Result is

mysql> show variables like "%character%";show variables like "%collation%";

+--------------------------+----------------------------+
| Variable_name | Value |
+--------------------------+----------------------------+
| character_set_client | utf8 |
| character_set_connection | utf8 |
| character_set_database | utf8 |
| character_set_filesystem | binary |
| character_set_results | utf8 |
| character_set_server | utf8 |
| character_set_system | utf8 |
| character_sets_dir | /usr/share/mysql/charsets/ |
+--------------------------+----------------------------+
8 rows in set (0.00 sec)

+----------------------+-----------------+
| Variable_name | Value |
+----------------------+-----------------+
| collation_connection | utf8_unicode_ci |
| collation_database | utf8_unicode_ci |
| collation_server | utf8_unicode_ci |
+----------------------+-----------------+
3 rows in set (0.00 sec)

The directive has changed to character-set-system=utf8

http://dev.mysql.com/doc/refman/5.6/en/charset-configuration.html

http://stackoverflow.com/questions/3513773/change-mysql-default-character-set-to-utf8-in-my-cnf
четверг, 5 января 2012 г.

Install Spellcheck for Notepad++ on Windows

Notepad++ is an upgraded notepad application that provides a lot of functionality past the typical notepad application in Windows. Not only does it provide a tab system to view multiple files easily at the same time but it provides functionality to open and edit many more file types. To add spellcheck to Notepad++ you will need to download and install Aspell which you can complete by using the directions below.

  1. Download Aspell: Visit Aspell’s web site here, download the full installer, and at least one precompiled dictionary. Make sure you are installing the win32 versions of each file.
  2. Install Aspell: Now double click on the Aspell full installer which will be titled something like Aspell-0-50-3-3-Setup.exe. This will launch the installer and you will have to click Next a few times and choose what icons you also want installed. Keep the default location for the installation which will be C:\Program Files\Aspell.
  3. Install Dictionary: Now double click on the precompiled dictionary you have downloaded which in my case was the English dictionary and the file name was Aspell-en-0.50-2-3.exe. This will install an English dictionary into Aspell and allow you to start using it. You can install multiple dictionaries if you would like to spellcheck in multiple languages.
  4. Configure Notepad++: Now click on Notepad++ and it will ask the location of Aspell so type the following into the location field minus the quotes, “C:\Program Files\Aspell\bin”.
  5. Test Spellcheck: Now restart Notepad++, enter some text into a new file, and click the spellcheck button to see if it is working.

That is all that is required to have spellcheck begin to work with Notepad++. Remember that in the future if you install an application that needs some form of spellcheck you will more than likely be able to use Aspell.

суббота, 19 ноября 2011 г.

sdfsdf

http://www.oneddl.com/tag/Hell-on-Wheels+s01
prime-suspect
Person.of.Interest LOSTFILM
american-horror-story LOSTFILM
Pioneer.One
A.Lonely.Place.for.Dying.Part.1.2011.XviD-VODO
Death.In.Paradise
Death.Valley
http://www.oneddl.com/movies/puncture-2011-limited-720p-bluray-x264-amiable/

http://www.oneddl.com/tv-shows/national-geographic-mystery-files-king-arthur-720p-hdtv-x264-vild/
http://www.oneddl.com/tag/national-geographic/

пятница, 18 ноября 2011 г.

http://code.google.com/p/gerrit/
https://github.com/masone/gitosis-web-admin
http://gitblit.com/
http://gitorious.org/gitorious
http://forums.admon.org/linux-software/6073-best-web-interface-git-repositories.html
http://www.indefero.net/open-source/

среда, 9 ноября 2011 г.

Dynamic DIV Adding To Document


Div :